BA
Baluu
Docs
    • Can I Email Attendees for a Specific Event?
    • How can I view my Guestlists and check attendance?
    • Recording Online Events
    • I'm changing my Business address
    • Business Community Guidelines
    • How to get more bookings for online events
    • The Dos and Don'ts for online events
    • Adding Notes to a Customer Booking
    • How can I cancel my events in bulk?
    • Using the Description Toolbar in Event Basic Details and Emails
    • How to run a test booking on Baluu
    • How to close your Baluu account
    • How do I delete an instructor/team member?
    • How do I set a minimum age for my event?
    • How to Export Customer Data
    • What video conference platform can I use to host my online events?
    • Can I resend any auto-emails to my customers?
    • Is Baluu GDPR Compliant?
    • How do I add a new event location?
    • How to Hide, Archive or Delete an Event
    • How to Extend Gift Card Expiry Dates?
    • How to Edit Customer Details
    • Invoice Management: Marking as Paid and Cancelling Invoices
    • How to Add a Mandatory Tick Box for Terms & Conditions
    • Why Customers Encounter Errors When Trying to Cancel or Reschedule Events
    • How to Change Your Payout Schedule
    • Where to View Your Bookings and Estimated Earnings
    • How to Change Your Baluu Booking Website Link?
    • How to Update Event Availability?
    • Adding new time slots to existing by appointment availability
    • Time Off (For Appointment-Based Sessions)
    • How to Redeem a Gift Card or Discount Code: Step-by-Step Guide
    • Adding new time slots to existing by appointment availability
    • How to Manually Add an Attendee to a Session in Baluu
    • How do I redeem a gift voucher/gift card?
    • Adding Analytics and Tracking Code
    • How to add or remove guests from a booking
    • How to Review Emails Sent to Your Customers
    • Duplicate Listing
    • How to Manage Notifications in Baluu
    • How to Enable Google and Apple Pay?
    • Search Help
    • Reminders
    • How to Create Bundles V2
    • Setting How Far in Advance Customers Can Book
    • How to Cancel a Booking and Issue a Refund
    • How to Create an Online Event on Baluu
    • How to Use Your Bundle (Customer Guide)
    • How to Update Your Subscription Plan
    • How to Email All Your Customers
    • Introducing the New Basket Function
    • Multi-Date Selection: Allow Customers to Book Multiple Dates in One Purchase
    • How to Change the Email Address Customers Reply To
    • Understanding Min / Max Selection for Add-on Groups
    • Managing Reviews in Baluu
    • Managing Membership Members
    • How to Manually Add a Booking Using a Customer’s Bundle or Membership
    • How to Show Exact Spaces Remaining on Your Class
    • How to Change Payment Details for Private Payments and Invoices?
    • How to Change Ticket Prices for Future Fixed-Date Sessions Without Affecting Existing Dates
    • How to Merge Two Customer Accounts
    • Late Booking Tolerance
    • How to Update the Date, Time or Location of an Existing Term
    • Private Payments/Invoices
    • Rescheduling Bookings
    • How does the Waiting List feature work?
    • How to reschedule my customers from one listing to another
    • How do I refund a customer for a term?
    • Can I refund a customer for a bundle?
    • Can I reduce a customer's bundle?
    • Stripe Connect
    • VAT Reporting and Sales Reports
    • My discount code is not working
    • Add or Edit a Product Delivery Option
    • Using Discount Codes for Offline Payments

Introducing the New Basket Function

We’ve introduced a new Basket Function that allows customers to purchase multiple events or products in one single checkout.

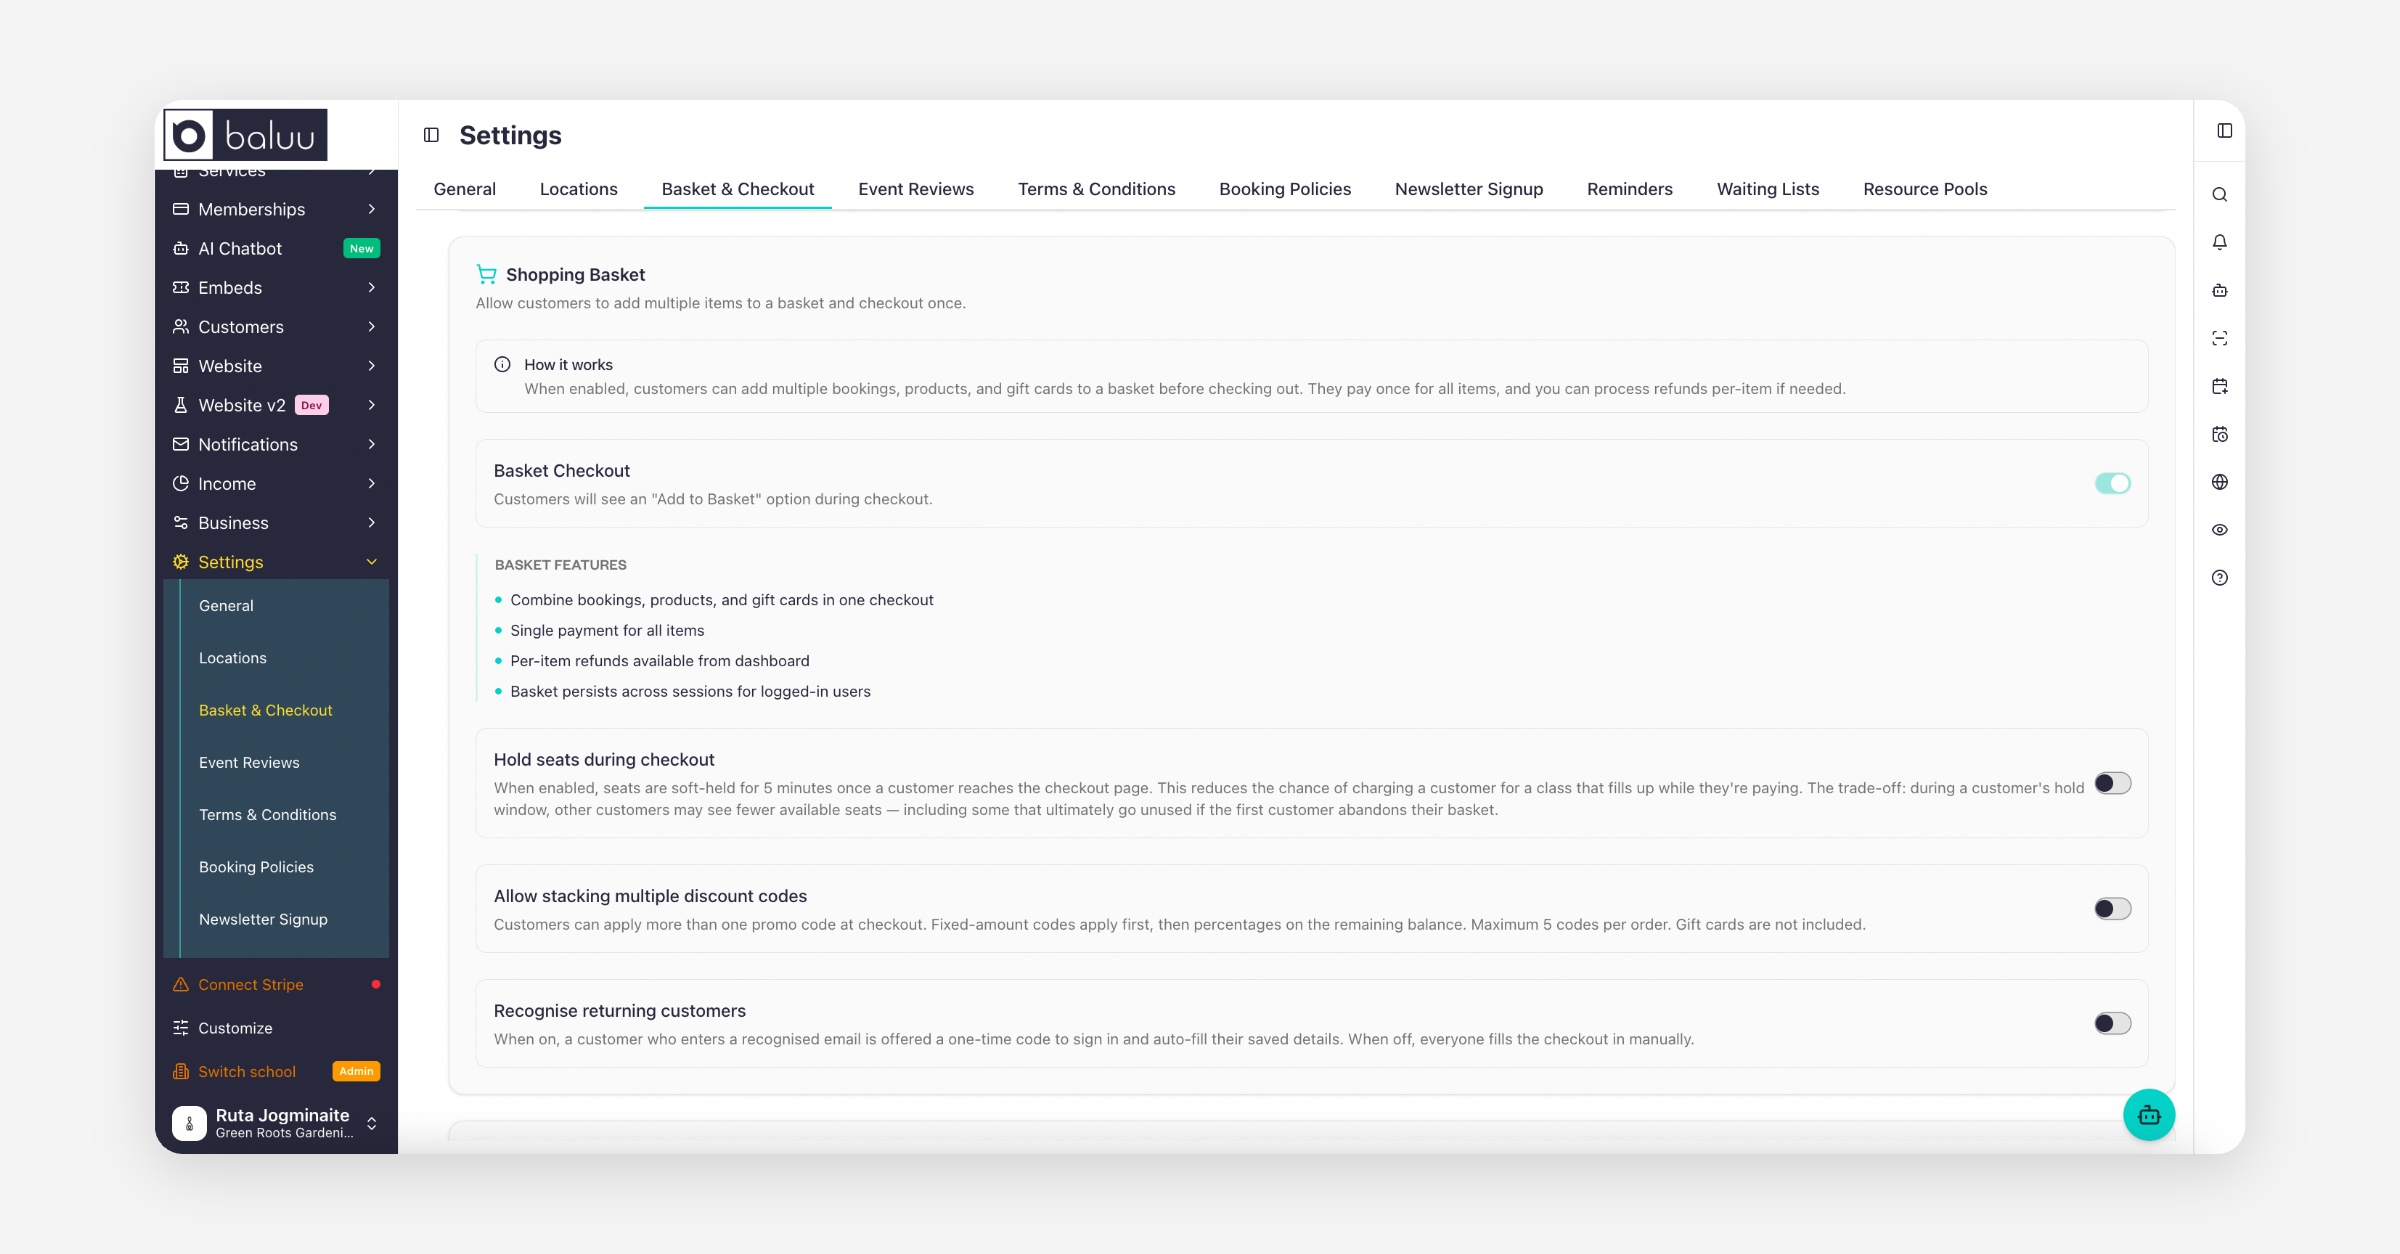
If you’d like to enable it in your dashboard, simply follow these steps:

  1. Go to Settings

  2. Select Basket & Checkout

  3. Scroll down to Shopping Basket

  4. Click Enable

  5. Scroll down and click Save Checkout Settings

Once enabled, the basket function will be active on your account. This means customers can add multiple events or products to their basket and pay for everything together in one transaction.
How the Basket Function Works

Here’s how the new basket feature works from a customer’s perspective:

  1. A customer goes to one of your events.

  2. Clicks Booking Options.

  3. Selects to book the event.

  4. Chooses a date.

  5. Selects a ticket.

  6. Enters their details (name, phone number, etc.).

  7. Clicks Continue.

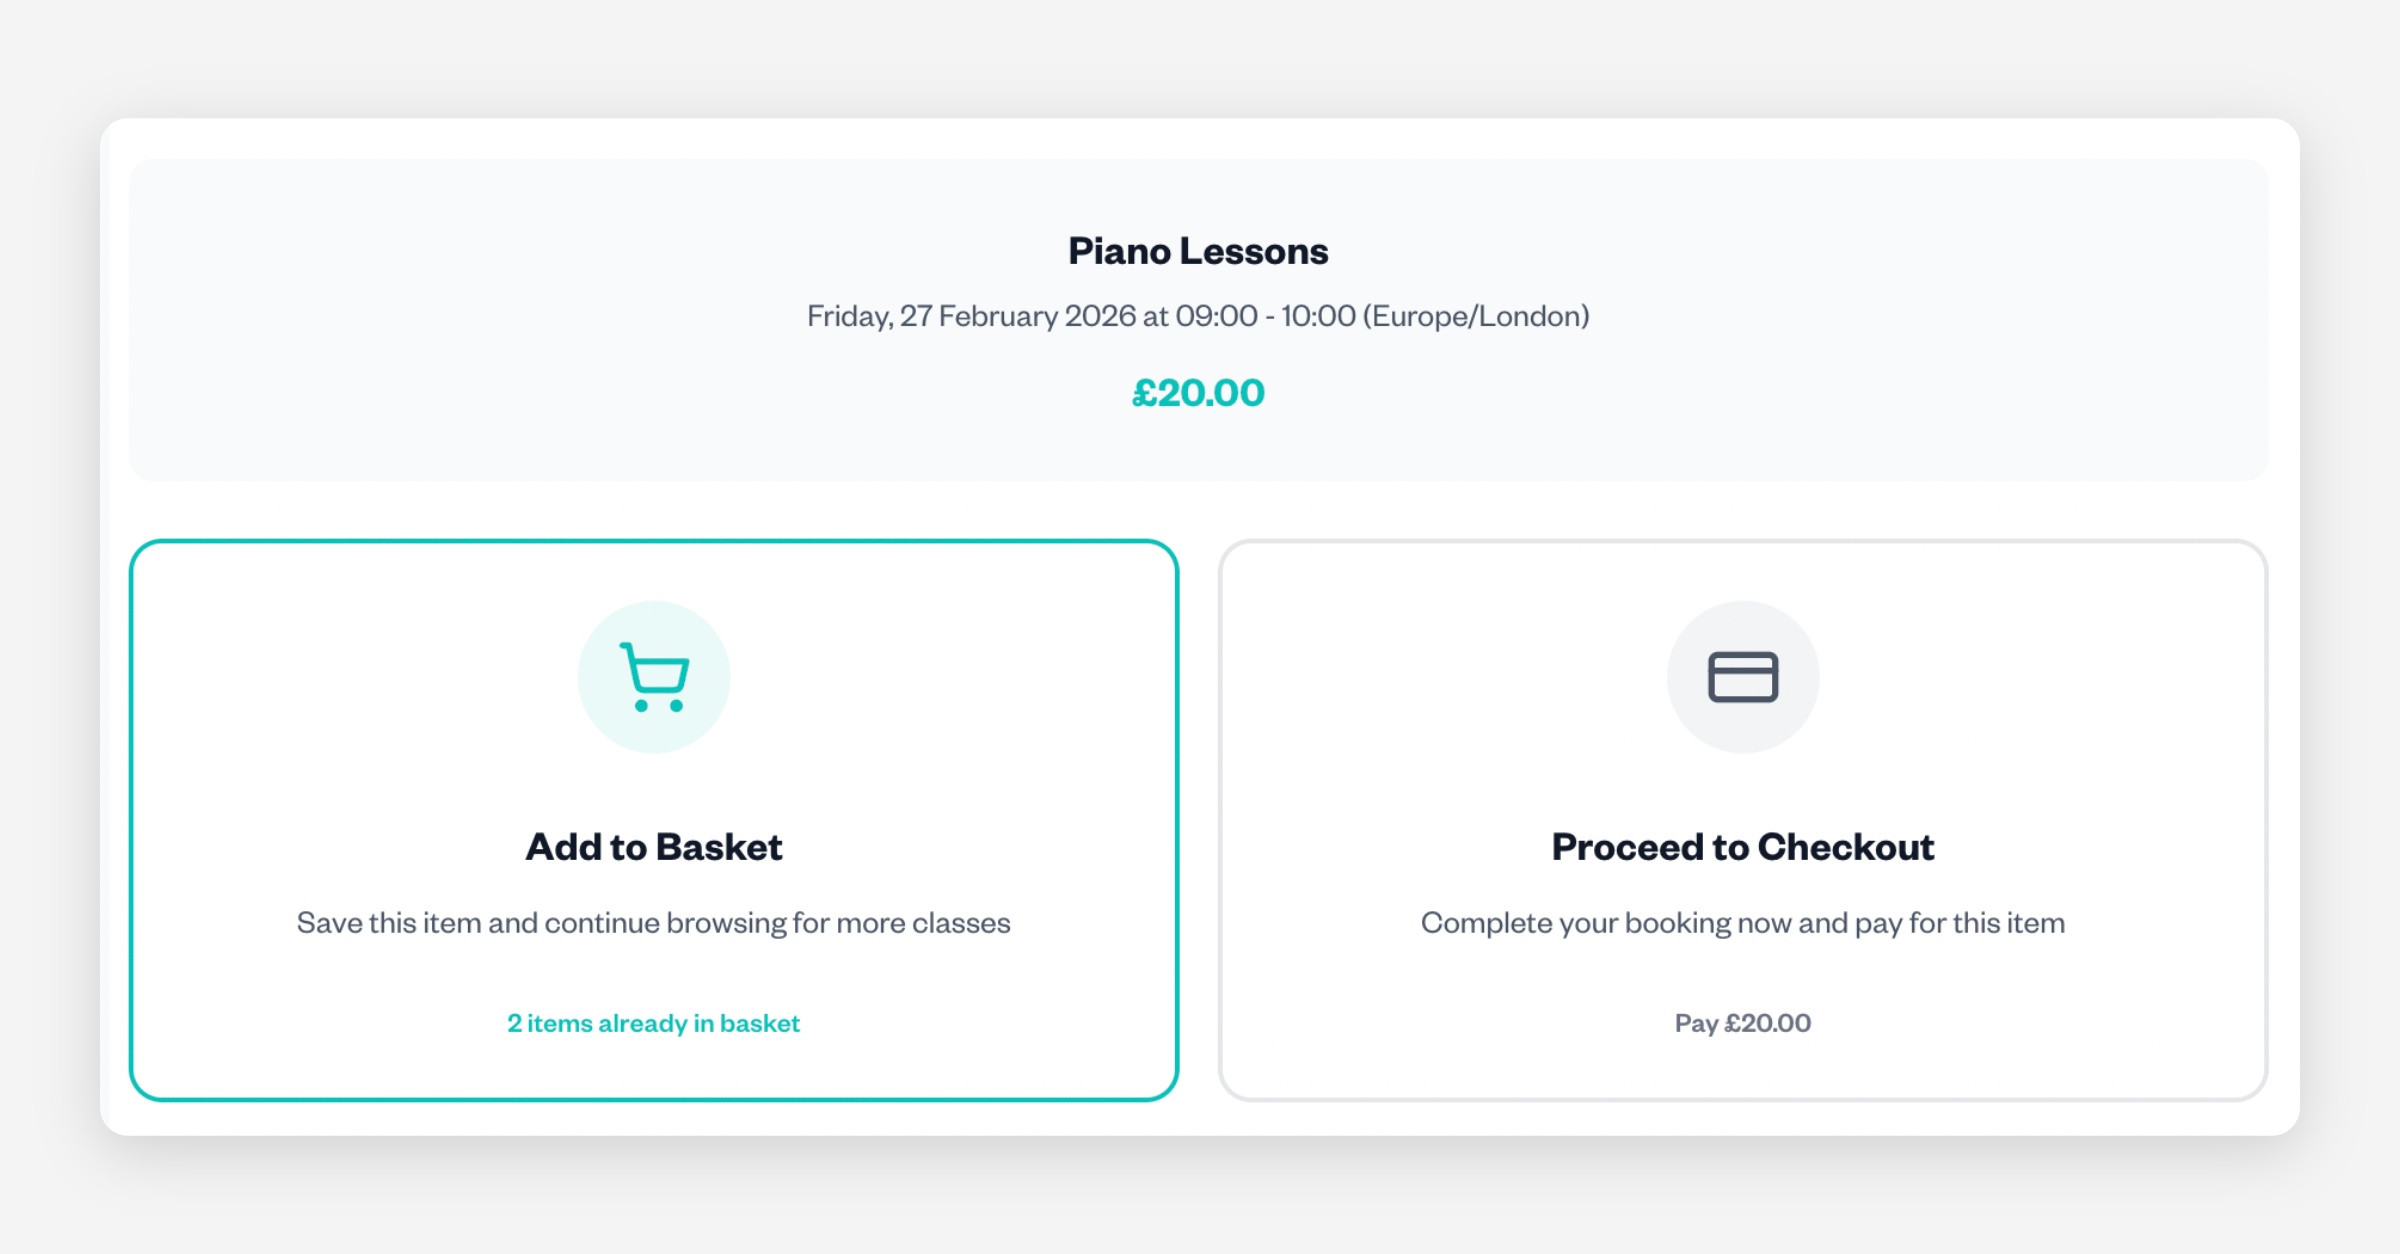
At this point, they will see two options:

  • Proceed to checkout

  • Add to basket

If they choose Add to basket, they can then return to your events or products and continue shopping.

Basket Overview

In the right corner, customers will see a basket icon.
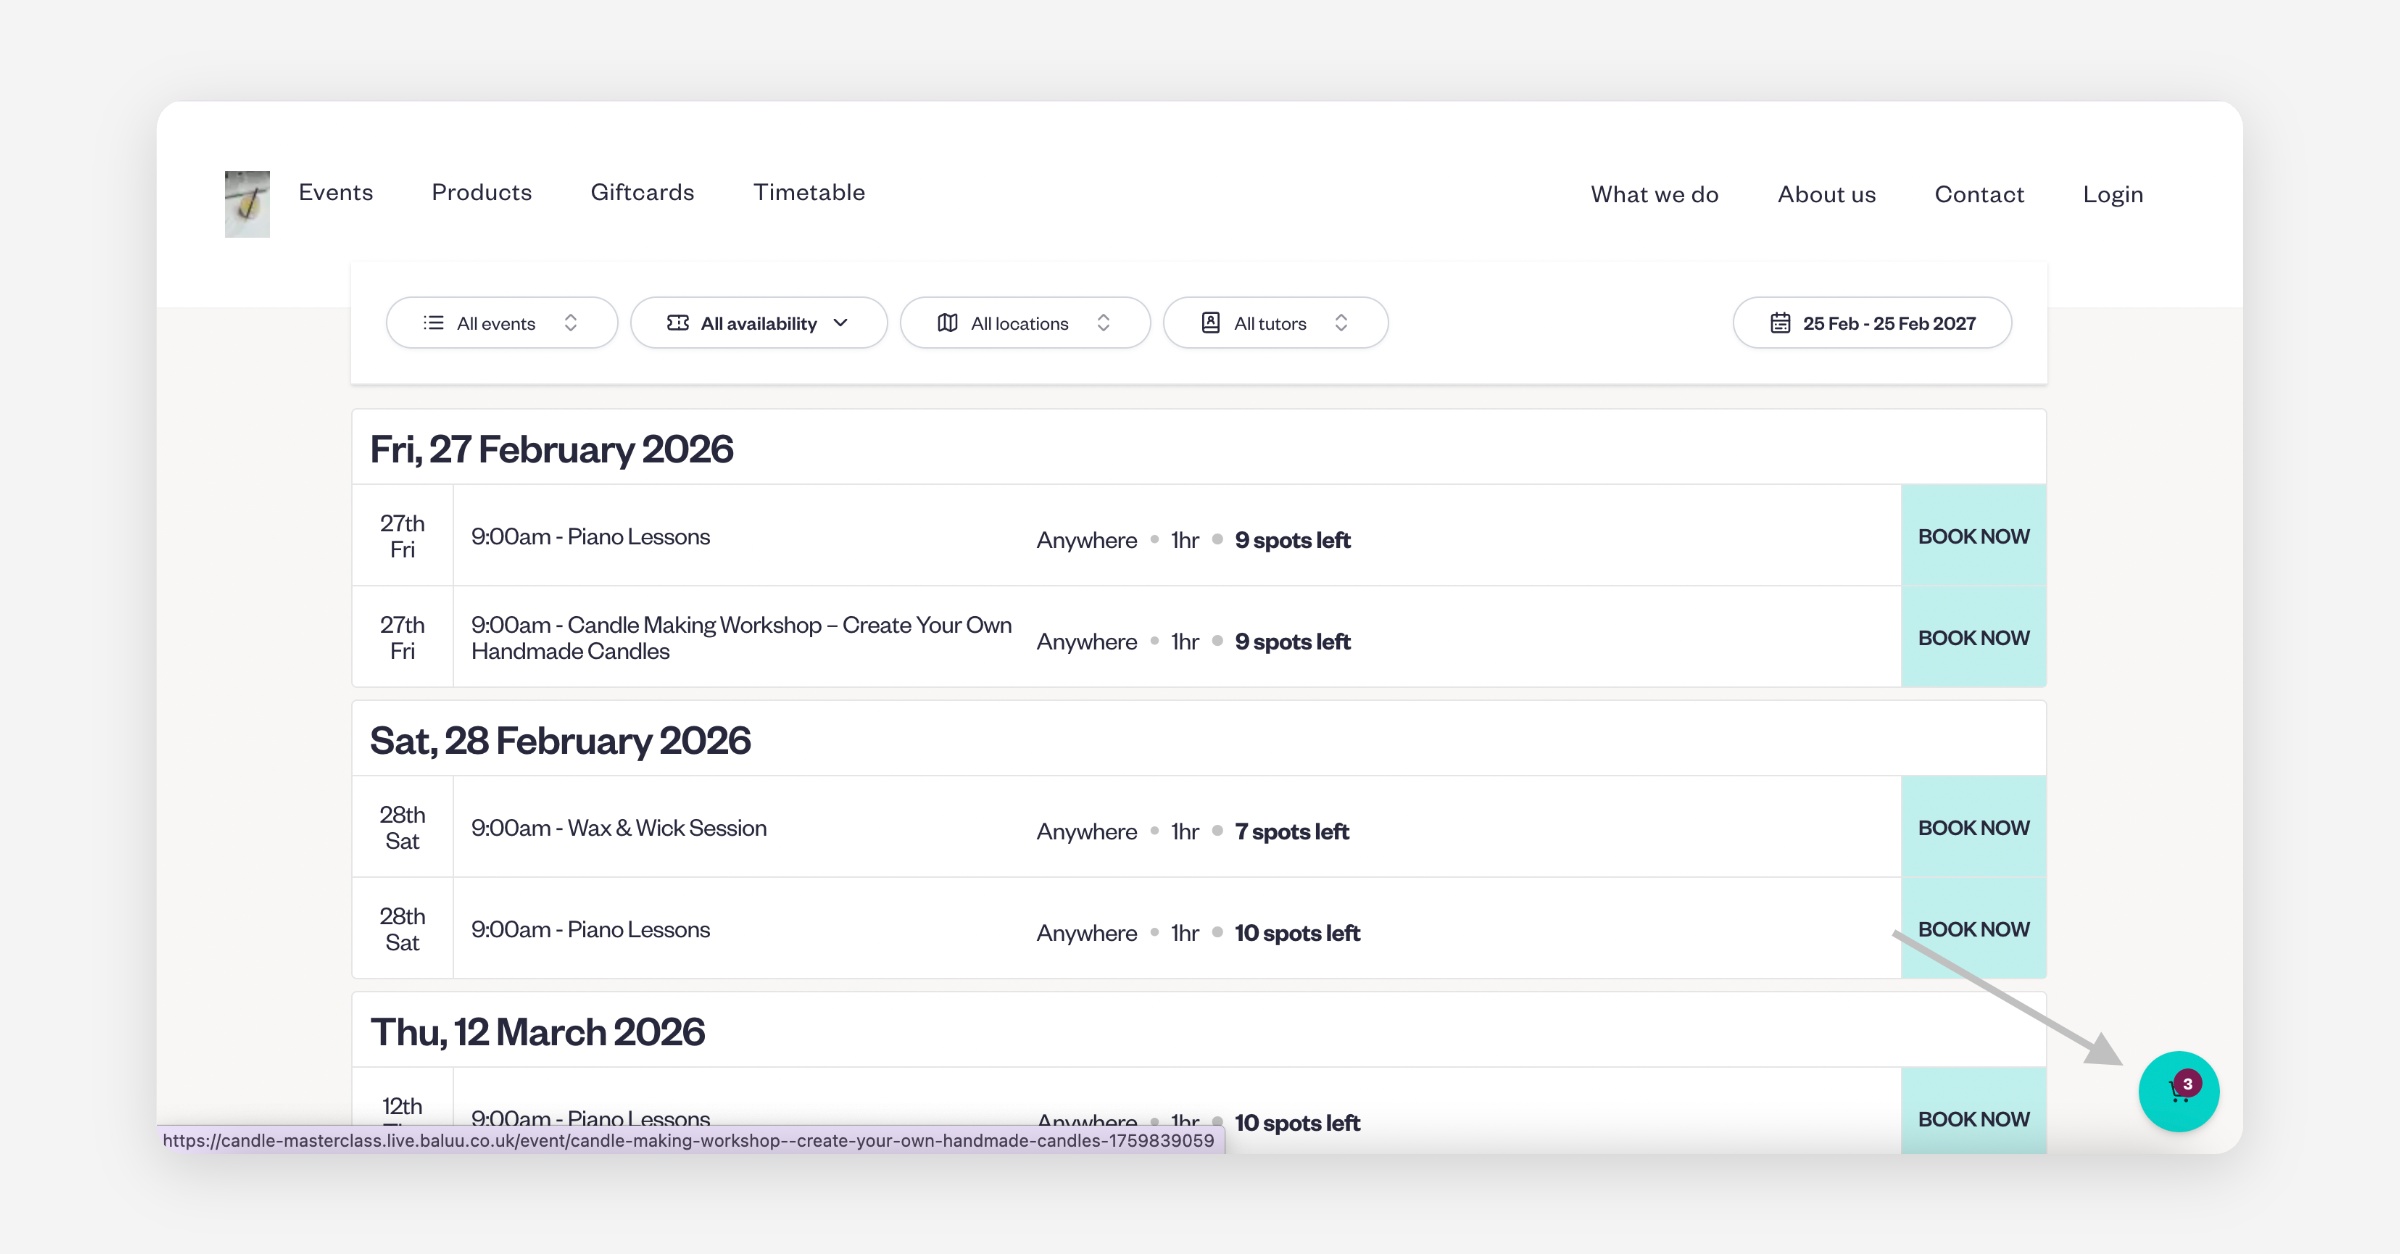
This allows them to view everything they’ve added to their basket before checking out.
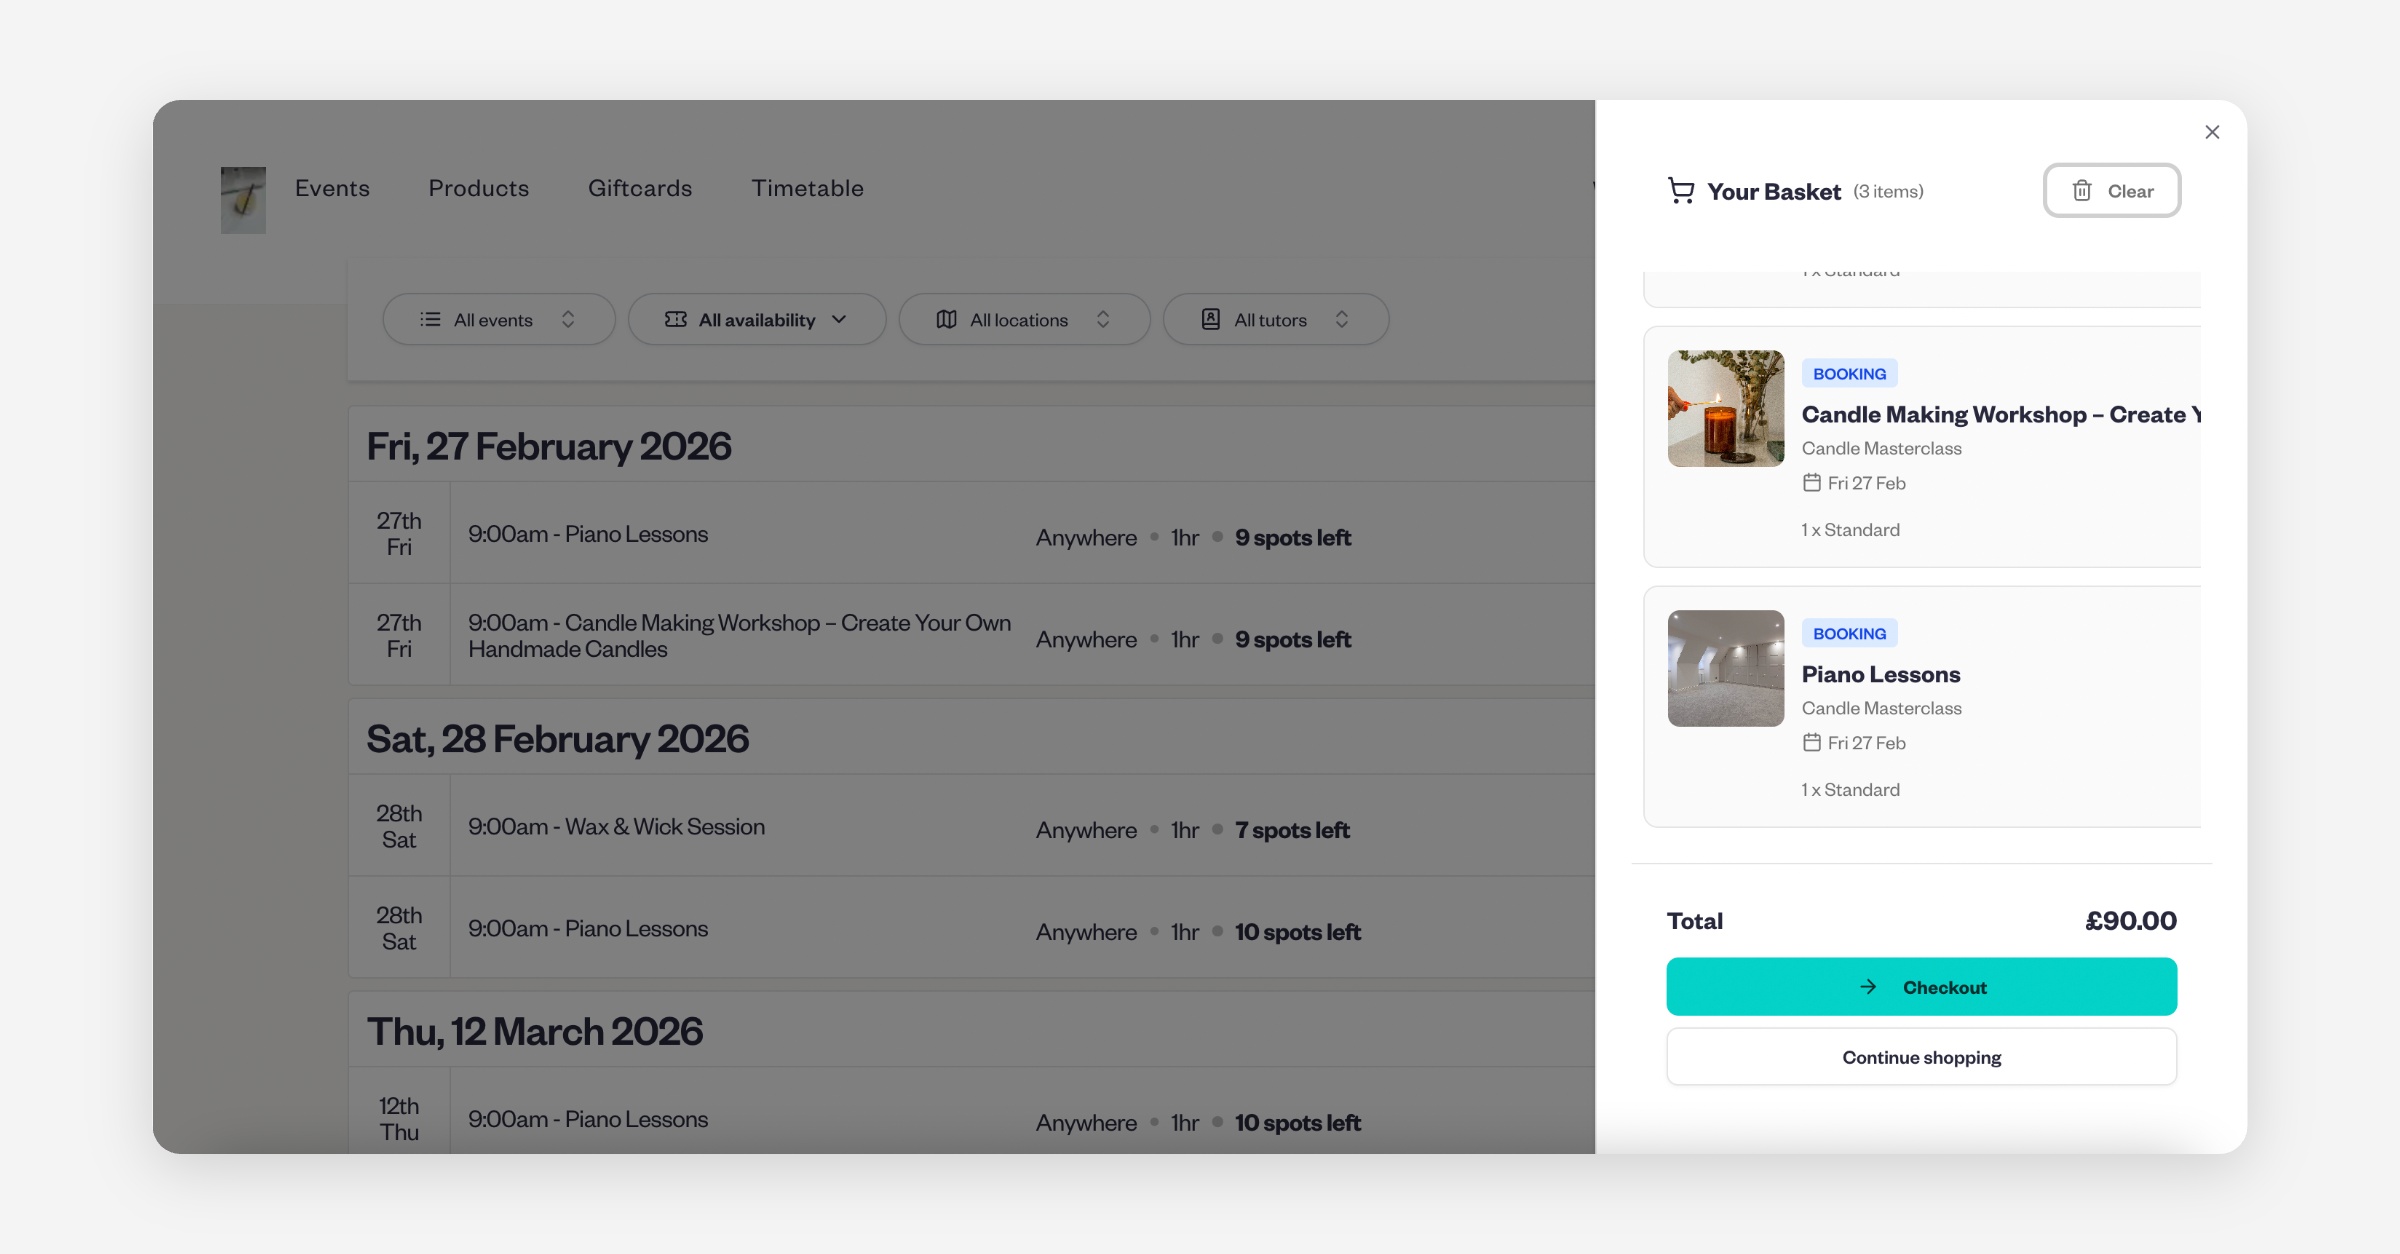
Each event or product is still processed individually in the system. Customers will continue to receive:

  • Confirmation emails

  • Reminder emails

  • Any other relevant notifications

This works exactly the same as it does now when purchases are made separately.

Discounts and Gift Codes

Customers can also apply a discount code or gift code to the entire basket during checkout.

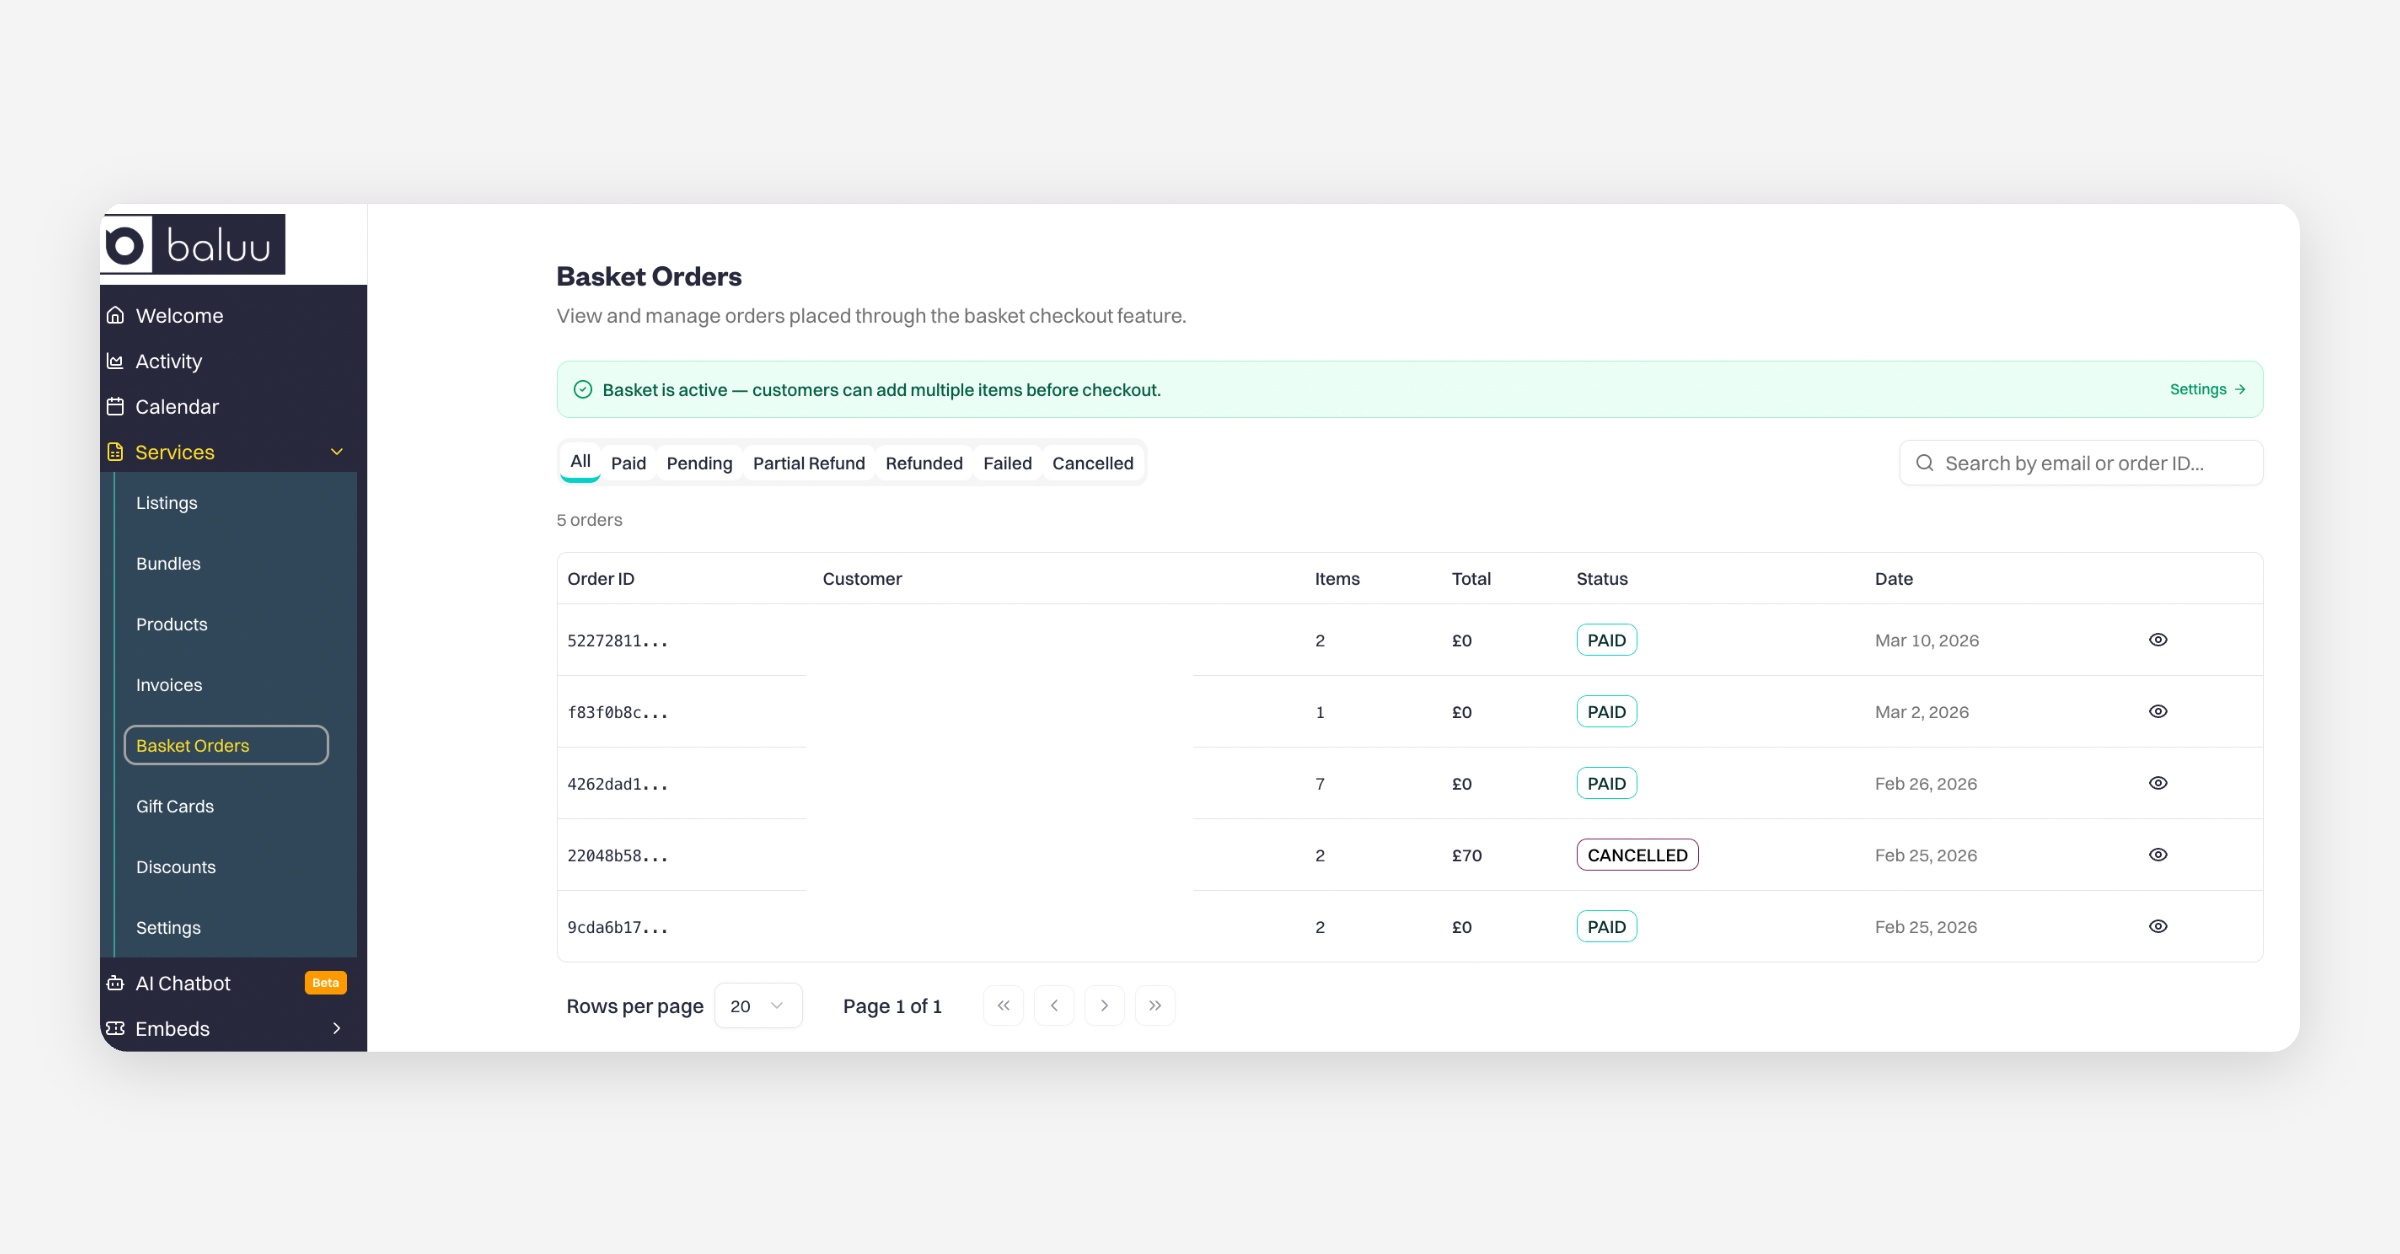
Managing Basket Orders

When customers place an order using the basket checkout, you can easily view and manage these bookings in your dashboard.

To see basket orders:

  1. Go to Services in your dashboard.

  2. Select Basket Orders.

You will also receive email notifications when a new basket order is placed.

You can manage or edit these notifications at any time by going to:
​Settings → Notifications
or by visiting:
​https://app.baluu.io/settings/notifications

This allows you to control which email alerts you receive for basket orders and other activities on your account.

Additional Basket & Checkout Settings

The basket feature works alongside several other checkout settings found under Settings → Basket & Checkout:

  • Stripe Hosted Checkout — Redirect customers to Stripe's secure hosted payment page instead of using Baluu's embedded checkout. This can help resolve issues with payment methods such as Apple Pay.

  • Mandatory Acceptance — Require customers to accept your terms and conditions before completing checkout.

  • Require Sign-In — Require customers to sign in or create an account before making a booking for a faster checkout experience on future purchases.

  • Booking Confirmation — Choose whether bookings are automatically confirmed or require manual approval before payment is captured.

  • QR Codes in Confirmation Emails — Include a QR code in booking confirmation emails for quick and easy check-ins.

  • Late Booking Tolerance — Allow customers to continue booking for a short period after a session has started, ideal for walk-ins and late arrivals.

  • Multi-Date Selection — Allow customers to select and add multiple dates to their basket in a single action.

  • Multiple Promo Codes — Allow customers to apply multiple discount codes to a single basket order.

  • Payment Plans (coming soon) — Allow customers to spread payments for larger orders over instalments.

PrevHow to Email All Your Customers
NextMulti-Date Selection: Allow Customers to Book Multiple Dates in One Purchase
Was this helpful?